When you want to send a group of outreach emails you need to create a campaign. We have created a 5-step campaign wizard to help you quickly create the campaign and send your emails.
Here are the steps involved:
Step 1 – Define the type of campaign
When you launch the campaign wizard you will first need to enter the campaign name. Try to pick a name that clearly states what the campaign is about. For Agency accounts, there is also an option to select a project associated with the campaign.
Next, you will choose the type of campaign you want to run. We will adjust the campaign wizard based on your answer:
Our options are:
- Lead generation – perfect for generating leads/sales for your business.
- Content promotion – use this if your main focus is to get more reach and exposure for a new piece of content.
- PR campaign – use this when you want to get some press for your product or service.
- Build links and authority – use this campaign type to reach out for link building or guest blogging opportunities.
- Influencer marketing – choose this campaign type when reaching out to influencers.
- Account management – great for sending emails that nurture relationships, improve retention, and increase sales with existing customers.
- Other – If you have an idea for another type of campaign select this option and project associated with the campaign. (For Agency Plan)
All campaigns must be part of a project. If you don't have a project created already, jump out of the campaign wizard and create a project.


Step 2 – Configure your campaign
At this step, you will choose an email account you want to send the campaign emails from, set a time zone, and put a limit on a number of emails you want to send per day. It’s better to send fewer emails per day, so if it’s not an urgent campaign, you may want to space out emails a bit more.
By default, the option "Don't add prospect if already in a campaign" will be checked. In case, you want to include prospects that were a part of previous campaigns, un-check the option.

Step 3 – Define your list
You now have to build the list of people you want to reach out to. Here are your options:
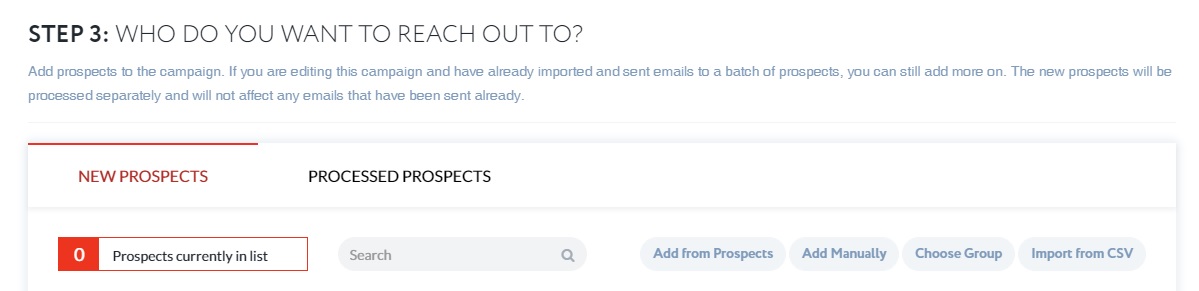
Add from Prospects
If you want to reach out to some of your existing prospects you can easily add them to your recipient list. Simply click on the Add from Prospects button and select the contacts or websites you want to add to the campaign.
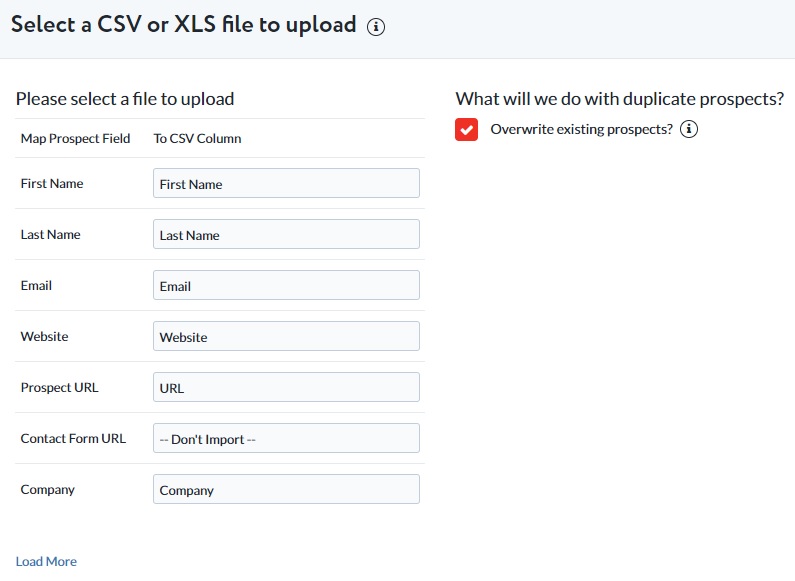
Import a CSV file
This is a file with a list of contacts/websites you already prepared. You specify the file name, the delimiter used (i.e. are fields separated by commas) and configure various settings:

When you import a CSV file you will need to map the fields to the existing fields in OutreachPlus. You may also need to map custom fields.

Choose Group
If you already have a list of prospects uploaded, you can group these prospects in various lists (e.g. influencer, blogger, etc). You can then use these lists for your campaigns.
All we need to know is the name of the list that you have already created.

Read this article on creating Groups
Add manually
You can add each new prospect manually. A prospect could be just a website and a contact form, a website with multiple contacts, or a contact without a website. How flexible is that!
Processed Prospects
If you are editing this campaign and have already imported and sent emails to a batch of prospects, these prospects will be under the Processed Prospects tab. You can still add more on as the new prospects will be processed separately and will not affect any emails that have been sent already.
Step 4 – Create your emails
Now you’re ready to create emails. You can create one email or a series of emails. However, we recommend creating at least one follow-up. A follow-up email is only sent out if we don’t detect a response to the initial email you sent.
After you create your first email click on 'Follow-up email' to create the subsequent ones.
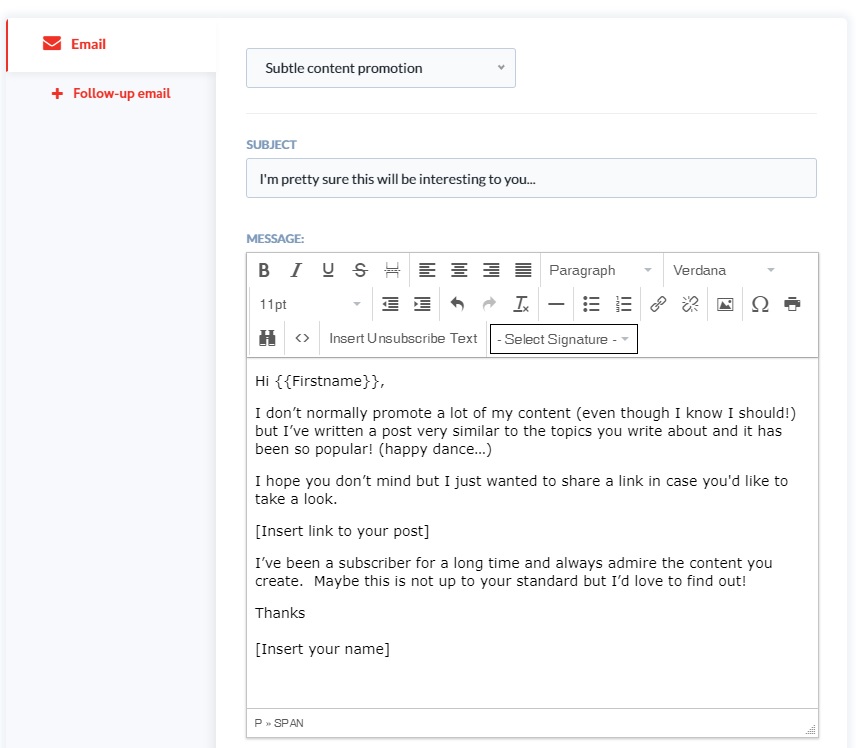
We have a series of pre-made templates for every campaign type. We advise you to use the template as a base and customize it. It’s not a good practice to send the exact same emails to all your prospects, so some level of customization makes sense.
To personalize your emails, use the merge codes available in the right sidebar. Merge codes are divided into contact (first name, last name, email, etc.), website/company (page title, URL, etc), and conditional merge codes.
At the bottom of the toolbar, you'll see an option to 'select signature' to make the email even more personal. You can also include an unsubscribe text by clicking on the 'insert unsubscribe text' in the toolbar.
In addition, you can include your initial outreach email in the follow-up to re-emphasize its message and make it easier for your prospects to respond. There is a checkbox that lets you easily turn this option on or off.
If you're really happy with the email you've created and you think you can use it for other campaigns as well, you can save it as a template. You can also set your template as private so only you can see it.
Step 5 – Review and send emails
You can now send your emails. You can specify if you want to queue all the emails up to go out on the next available slot or schedule a start time.

If you want you can also decide to customize every single email. For example, imagine you were emailing 20 influencers. You may want to write something personal for each influencer.
If you have forms to submit (i..e contact forms for websites) you will be asked to tick these off also