When you are sending emails to a group of people, templates can save you a lot of time. You can create a template that will be personalized automatically based on the merge codes you add. You can further customize every email individually before you send it.
Here are the steps for creating a template.
1. Go to the template menu and select the option for new template

2. Name the template and select a category
When you create a template, you'll need to add a name that describes what the template is about. You'll also need to choose a category. Later on, when you create a campaign, you'll select the campaign type and we'll show you the templates that are relevant to that category.
Template categories we currently have are:
- Lead generation - You want more leads for your business.
- Content promotion - Use this to promote your content, for example, your blog content.
- PR Campaign - Use this to reach out to the media and get some coverage for your products or services.
- Build links and authority - You want to generate links to your content.
- Influencer marketing - You want to build relationships with influencers
- Account management - Use this for reaching out to existing customers.
- Other - If any of these campaign types don't work then use the 'other' type.
3. Pick a system template to serve as a basis for your template - [optional]
When you select a new template you can pick one of our proven system templates to get you started. What's really important to know is that you will have to customize these templates. For example, you may need to take out merge codes that are not relevant to you.

When you see text in these type of brackets e.g. [Name], you need to take this out and put in your name. As you can see in the screenshot below, there is a merge code for 'PageTitle'. This is the title of a web page and it is only valid if you upload the website details of the prospect. There's also a merge code for 'Firstname'.
You can also see there is [insert article]. You may replace this with content or a merge code.

4. Set your template as private
When you create the template, you can set it as private so it's only visible to you. This is only relevant if there are more than one users on your OutreachPlus account.

5. Create the content for your template
When you create the template you can format it the way you want to and you can also include relevant merge codes to personalize your emails.
So, for example, by using the merge code for the first name you can automatically replace the merge code with the first name of the person you're emailing.
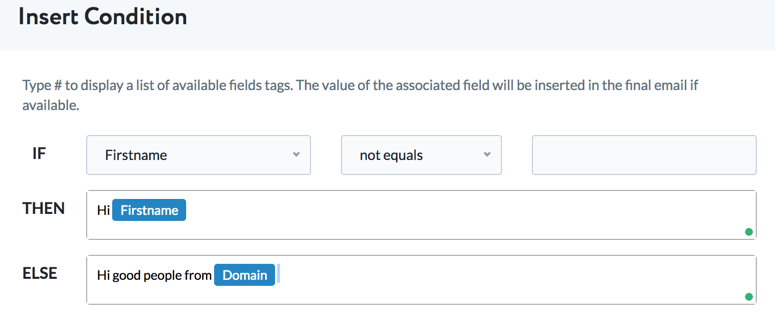
We also provide advanced functionality for building conditions. For example, you may have the first name for most people on your list but not for everyone. If this is the case you could set up a condition - If the first name is available then use this, otherwise, say something different. Here's how it looks:
Once you create your template it will be available to use within your campaigns. As mentioned, when you select the campaign type, we will show you the templates relevant to that campaign.
Note: You will see a campaign category called 'Other'. I'm sure you'll come up with ideas for campaign categories that don't fit with the ones we've picked so this is a catch-all!